If you own an Ultimaker or a simillar machine, you will find this very detailed troubleshooting guide very useful. It describes all possible problems and how to solve them.
Here is an example of "Pillowing", problem I didn't even know existed:
Jeremie Francois developed his own method of automatic print bed leveling and calibration by using some force sensors, Arduino to communicate with modified Marlin firmware and three Z-axis lead screws.
Guys from Make.Test.Battle,Ryan and Kash do a casual comparison of the Ultimaker 2 and the Print-Rite DIY 3D Printer from HobbyKing, as well as learn the importance of bed leveling.
They do a lot of Nerf toys modifications and upgrades with 3d printing.
It turns out you really get what you pay for in this case.
Why are 3d printers so expensive in Australia? Probably due to shipping, import and customs fees ... taxes maybe?
Here is a complete comparison video:
Something cool they make, modded Nerf toy guns, here the dart cylinder was 3d printed:
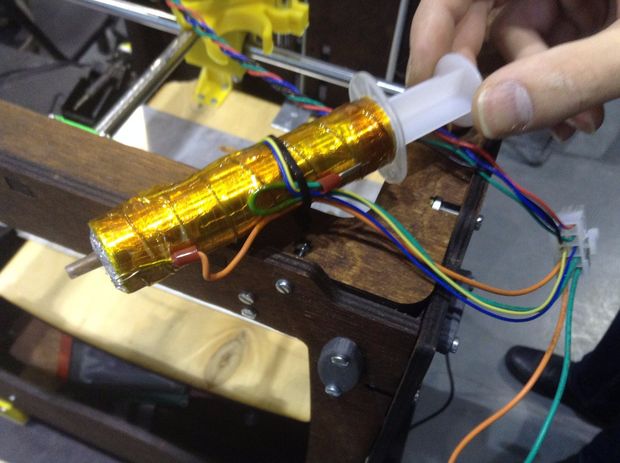
Here is an Instructable on how to build a DIY chocolate extruder for Ultimaker original. It is based on 20ml syringe with the inner diameter of 20mm. Syringe is covered with aluminum foil, then Kapton tape. The heater is made of NiCr wire coiled on covered syringe and itself covered with Kapton. To get uniform temperature on the syringe a layer is added of aluminum foil and Kapton outside the heater. Thermistor is NTC 100kOhm .
Dirk Janssen moded his original Ultimaker with food paste extruder based on a large syringe. He started with extruding peanut butter. Follow his Tumblr for future updates, the project is still in the development.
Ultimaker forum user by the name of FoehnSturm presented his approach to toolchanger mechanism on the original Ultimaker machine.
It uses a custom modular direct drive extruders with hot end placed in holders mounted on printer's frame. This extruder is powered by NEMA 8 motor and has a hotend like Merlin, Prometheus, E3D or similar. In the future it will use other tools also. This system can hack your Ultimaker in true multitool hybrid digital fabricator.
Do keep in mind that this project is still in the development but it looks very interesting. It could be also adapted to other 3d printers. My opinion was always that the multitool machines are the future.
Here is the first prototype:
... more developed version with higher accuracy and repeatability:
Here is the mechanism working well with dual extruders doing two color printing:
Here is the high speed tool change in action:
The mechanism can have magnetic connectors and supports different tools like polishing head:
You can see the entire thread on the UM forum with much more information and insight in the development process:
Ultimaker released new and upgraded Ultimaker 2+ and Ultimaker 2 Extended+. There are several upgrades but nothing major changed in the technology.
Main upgrades are:
Geared feeder mechanism
Easy-swap nozzles with 0,25, 0,4, 0,6 and 0,8mm nozzles
Optimized air flow with new fancaps
Both models have the same prices as the previous models, with the Ultimaker2+ (build volume: 223 x 223 x 205 mm) priced at € 1.895,00 excl. VAT and the Ultimaker 2 Extended+ (build volume: 223 x 223 x 305mm) priced at € 2.495,00 excl. VAT.
Retro Populator is an open source project by Eric Boyd that developed a kit for your 3d printer to convert it into pick and place machine suitable for small scale home electronics manufacturing.
Project description from hackaday.io:
A jig and software for allowing a 3D printer to do electronics pick-n-place assembly. It populates boards, by retrofitting a 3D printer, hence Retro Populator.
Motivation: surface mount soldering is great, but the process of placing parts is tedious and requires great manual dexterity as well good vision. Doing a few boards by hand is practical, but doing more than about 20 is hell on earth. Yet it's not practical (read: affordable) to pay industry to do it until about 500 boards - the setup charges just kill you. So there is this huge chasm between what's doable for hobbyists by hand, and where industry can take over, and this volume is commonly desired in the maker community - a small run of 50 to 100 boards is in fact typical. Thus, the desire to build machines that hobbyists can own to do electronics pick-n-place. Our cost-saving idea is to retrofit similar machines that makers already own: 3D printers.
Team: Rob Gilson Adam Evenden Charles Hartlaub Eric Boyd
There are several versions of Retro Populator being developed:
Version 1.0 : Essentially complete now. CNC milled acrylic base plate, with milled tape holders. Vacuum syringe for picking up parts, vacuum supplied by SMT rework station. Milled nozzle mount which attaches to the side of the existing extruder. Z-axis rezero jig to easily change re-zero height. 3D printed cam-lock parts to holds boards in place on 10mm peg-grid base. Code parses a yml file for board & tape placement info, and then an eagle .brd file directly for part types and locations. It generate a gcode file which goes from pick to place location for all of the parts which can be populated. Support for multiple boards.
Version 2.0: currently in planning/design. Addition of tape advancement, including plastic cover peeling. Addition of a second nozzle which will do solder paste dispensing. Software will have 'position confirm' feature where it will move to the corner of each board, and the first component on each tape, so that you can verify key locations directly before running the entire job.
Version 3.0: part rotation. Numerous other things we'll learn about as we do V2.0, no doubt...
Maybe we will soon have thousands of small electronics factories in garages competing with corporate sector ... But first who should be afraid of this competition are companies like Adafruit ... they are in the same market as those "hobbyists" ...


 09.24.00